La cartouche et l’imprimante utilisées dans cette vidéo peuvent ne pas sembler identiques aux vôtres, mais les mêmes procédures utilisées dans cette vidéo peuvent être utilisées pour la cartouche pour laquell vous avez choisi de résoudre les problèmes.
If you receive an error message stating that the “alignment failed” or that the ”alignment could not be completed”, this may indicate that the printer is not properly recognizing the cartridge.
Remove the cartridge from your printer and locate the copper contacts. Ensure that the copper strip is intact; and if so, you will want to clean the contacts from any obstruction or debris as this may be preventing the alignment from completing.
Using a lint free cloth (such as a coffee filter), gently wipe the copper contacts to remove any obstruction or debris.
It may also be helpful to clean the nozzle plate to ensure a proper ink flow. Dampen a lint-free cloth with bottled water and gently wipe the nozzle plate 2-3 times until you see ink appearing on the cloth. Please note that the ink will stain any underlying surfaces so please use caution and discard the cloth as soon as the nozzle plate has been cleaned.
Reinstall your cartridge into the printer and attempt the alignment process again.
If the error continues, it may be necessary to perform a cleaning cycle to improve the quality of the print and allow the alignment process to be completed. Every printer is different so please consult your printer’s user manual for instructions on performing a cleaning cycle on your specific printer.
If you are not able to perform a cleaning cycle or if the alignment fails even after performing a cleaning cycle, please ensure that the scanner glass is clean and free from fingerprints or debris (this applies to certain models only).
If these steps do not allow the printer to align the cartridge(s), you will need to return the cartridge(s) to the place of purchase.
La cartouche et l’imprimante utilisées dans cette vidéo peuvent ne pas sembler identiques aux vôtres, mais les mêmes procédures utilisées dans cette vidéo peuvent être utilisées pour la cartouche pour laquell vous avez choisi de résoudre les problèmes.
If you encounter an error message stating that the cartridge cannot be recognized, is an incompatible cartridge, the wrong cartridge is installed or if your printer has blinking lights, there may be a simple solution to fix this.
Confirm that the cartridge pictured matches the cartridge you have in your hand or installed in your machine.
Confirm that the printer you are using is listed in the printer compatibility table as a suitable printer for the cartridge you are trying to install.
If ONE of these TWO criteria do NOT match, you have most likely received the incorrect cartridge for your printer. Please visit our PRINTER COMPATIBILITY page in order to determine what cartridge you need for your machine.
Once you have confirmed you have the correct cartridge for your printer, open the cover on the printer and remove the cartridge.
Upon removing the cartridge, you will need to locate the copper contacts . If the copper strip is missing, the cartridge will not function and will need to be replaced.
Make sure not to touch or remove the copper strip. These contacts communicate with the printer to print your documents.
If the copper strip is intact, you may need to clean the contacts from any type of obstruction or debris as this may be the cause of the error.
You may use a pencil eraser to clean the contacts.
Gently brush the copper strip with the pencil eraser to remove any potential obstruction or debris.
You may also use any type of lint free cloth or a coffee filter.
Again, gently wipe the copper strip with the lint free cloth removing any type of obstruction or debris.
Once this is complete, replace the cartridge in the cradle, close the lid and then follow any on screen prompts that may appear.
If the problem persists after returning the cartridge to its cradle, you will want to reset your printer.
This can be done by turning off your computer and your printer with the cartridges installed.
Unplug your printer and leave your machines off for 2 minutes.
Restart the printer and your computer, and attempt your print again.
If you have attempted both of these procedures and you encounter the same error, there is most likely an electrical problem with the cartridge, and you should return the cartridge to the place of purchase.
If you need to print right away and this troubleshooting did not solve the problem with your cartridge, please select the option entitled "One Cartridge Printing"
La cartouche et l’imprimante utilisées dans cette vidéo peuvent ne pas sembler identiques aux vôtres, mais les mêmes procédures utilisées dans cette vidéo peuvent être utilisées pour la cartouche pour laquell vous avez choisi de résoudre les problèmes.
To install your remanufactured cartridge in your printer, begin by removing the old cartridge from the printer.
Next, remove the plastic clip from the cartridge. Clips come in many forms and may not look exactly like the one in the video.
Now your cartridge may be installed into the printer.
*The cartridge and printer shown may vary from yours, but the general installation instructions are the same.
La cartouche et l’imprimante utilisées dans cette vidéo peuvent ne pas sembler identiques aux vôtres, mais les mêmes procédures utilisées dans cette vidéo peuvent être utilisées pour la cartouche pour laquell vous avez choisi de résoudre les problèmes.
Confirm that the cartridge pictured matches the cartridge you have in your hand or installed in your machine.
Confirm that the printer you are using is listed in the printer compatibility table as a suitable printer for the cartridge you are trying to install.
If ONE of these TWO criteria do NOT match, you have most likely received the incorrect cartridge for your printer. Please visit our PRINTER COMPATIBILITY page in order to determine what cartridge you need for your machine.
Once you have confirmed you have the correct cartridge for your printer, the first step is to make sure you have properly removed the clip from the cartridge.
This clip protects the electrical circuitry on the cartridge and also keeps the cartridge from leaking.
Once the clip has been removed, you should see a copper strip and this is the cartridge’s contacts. These contacts communicate with the printer to print your documents. Please keep in mind that there are various styles of clips and that the clip we are removing in the video may not be identical to the one on your cartridge. Clips will vary in color, size and shape depending on the cartridge model and supplier of your remanufactured inkjet.
After you remove the clip, please make sure that you are installing your cartridge into the correct location in the printer. Please consult your printer’s user manual to learn how to correctly install your remanufactured inkjet cartridge.
If you are trying to install the cartridge in the correct location, the cartridge may have been mislabeled and should be returned to the place of purchase.
If you need to print right away and this troubleshooting did not solve the problem with your cartridge, please select the option entitled "One Cartridge Printing"
La cartouche et l’imprimante utilisées dans cette vidéo peuvent ne pas sembler identiques aux vôtres, mais les mêmes procédures utilisées dans cette vidéo peuvent être utilisées pour la cartouche pour laquell vous avez choisi de résoudre les problèmes.
Some remanufactured cartridges come with a clip that protects the printhead and helps to preserve and maintain the quality of the cartridge.
To remove this clip, place the cartridge on a solid surface. Holding the clip with one hand, press down on the cartridge with the other hand and pull back on the clip.
You may also find it helpful to think of the clip as the tab on a soda can. Place the cartridge on a solid surface with the clip at the top. Hold the cartridge in one hand and "peel" the clip back with the other.
Some resistance is normal so don't be alarmed.
You may notice some residual ink on the pad or some ink on the printhead of the cartridge. This is also normal as some clips serve to prime the cartridge in order to allow it to function properly.
Once the clip has been removed, you may install the cartridge into your printer as normal.
If you need to print right away and this troubleshooting did not solve the problem with your cartridge, please select the option entitled "One Cartridge Printing"
La cartouche et l’imprimante utilisées dans cette vidéo peuvent ne pas sembler identiques aux vôtres, mais les mêmes procédures utilisées dans cette vidéo peuvent être utilisées pour la cartouche pour laquell vous avez choisi de résoudre les problèmes.
If you notice that the ink gauge displays low or no ink level, DO NOT be alarmed. This is very common because you are using a remanufactured inkjet. The ink gauge on your printer will no longer read the ink levels correctly because it does not recognize your cartridge as “new”. There is no way to reset this gauge, but this message can be bypassed easily when necessary and will not affect your printing performance.
Keep in mind that the ink gauges on printers only serve as an ESTIMATE of how much ink may be remaining in the cartridge.
To continue printing, press and hold the stop/reset button or the resume button for 10 seconds.
You may click here to see if your printer model is listed and follow the instructions specific to your printer. Otherwise, please consult your printer’s user manual if you are not sure which button to press.
If your printer displays a low or empty ink level, you may be able to resolve this by cleaning the cartridge contacts.
Open the cover on the printer and remove the cartridge. Upon removing the cartridge, you will need to locate the copper contacts . If the copper strip is missing, the cartridge will not function and will need to be replaced.
Make sure not to touch or remove the copper strip. These contacts communicate with the printer to print your documents.
If the copper strip is intact, you may need to clean the contacts from any type of obstruction or debris as this may be the cause of the error.
•You may use a pencil eraser to clean the contacts. •Gently brush the copper strip with the pencil eraser to remove any potential obstruction or debris. •You may also use any type of lint free cloth or a coffee filter. •Again, gently wipe the copper strip with the lint free cloth removing any type of obstruction or debris.
Once this is complete, replace the cartridge in the cradle, close the lid and then follow any on screen prompts that may appear.
If that does not clear the error, your cartridge may not contain the technology that will read a correct ink level. If this is the case, this message can be bypassed easily and will not affect your printing performance.
Keep in mind that the ink gauges on printers only serve as an ESTIMATE of how much ink may be remaining in the cartridge.
To continue printing, press and hold the stop/reset button or the resume button for 10 seconds.
Please consult your printer’s user manual if you are not sure which button to press.
La cartouche et l’imprimante utilisées dans cette vidéo peuvent ne pas sembler identiques aux vôtres, mais les mêmes procédures utilisées dans cette vidéo peuvent être utilisées pour la cartouche pour laquell vous avez choisi de résoudre les problèmes.
If your cartridge has stopped printing and you have just recently installed it into your machine, please follow the steps below to resolve the issue.
If you notice that the ink gauge displays low or no ink level, DO NOT be alarmed. This is very common because you are using a remanufactured inkjet. The ink gauge on your printer will no longer read the ink levels correctly because it does not recognize your cartridge as “new”. There is no way to reset this gauge, but this message can be bypassed easily when necessary and will not affect your printing performance.
Keep in mind that the ink gauges on printers only serve as an ESTIMATE of how much ink may be remaining in the cartridge.
To continue printing, press and hold the stop/reset button or the resume button for 10 seconds.
You may click here to see if your printer model is listed and follow the instructions specific to your printer. Otherwise, please consult your printer’s user manual if you are not sure which button to press.
La cartouche et l’imprimante utilisées dans cette vidéo peuvent ne pas sembler identiques aux vôtres, mais les mêmes procédures utilisées dans cette vidéo peuvent être utilisées pour la cartouche pour laquell vous avez choisi de résoudre les problèmes.
If you are not able to receive faxes automatically due to a low ink message, you can deactivate the ink level detection and manually retrieve any stored faxes. This is usually accomplished through pressing a series of buttons, and your printer manual will provide instructions for your specific printer model. Click here to be directed to the OEM website where you can download your printer's user manual.
Please note that if you deactivate the ink level detection feature, the cartridge will need to be changed immediately when the ink begins to show signs of running out (poor print quality, streaks or lines in the print, etc). If the cartridge runs out of ink and a fax is printed inadequately, you will not be able to reprint the page. Once a page of the fax prints, the fax is deleted from memory and cannot be retrieved.
La cartouche et l’imprimante utilisées dans cette vidéo peuvent ne pas sembler identiques aux vôtres, mais les mêmes procédures utilisées dans cette vidéo peuvent être utilisées pour la cartouche pour laquell vous avez choisi de résoudre les problèmes.
If you encounter an error message stating that the cartridge cannot be recognized, is an incompatible cartridge, the wrong cartridge is installed or if your printer has blinking lights, there may be a simple solution to fix this.
Confirm that the cartridge pictured matches the cartridge you have in your hand or installed in your machine.
Confirm that the printer you are using is listed in the printer compatibility table as a suitable printer for the cartridge you are trying to install.
If ONE of these TWO criteria do NOT match, you have most likely received the incorrect cartridge for your printer. Please visit our PRINTER COMPATIBILITY page in order to determine what cartridge you need for your machine.
Once you have confirmed you have the correct cartridge for your printer, open the cover on the printer and remove the cartridge.
Upon removing the cartridge, you will need to locate the copper contacts . If the copper strip is missing, the cartridge will not function and will need to be replaced.
Make sure not to touch or remove the copper strip. These contacts communicate with the printer to print your documents.
If the copper strip is intact, you may need to clean the contacts from any type of obstruction or debris as this may be the cause of the error.
You may use a pencil eraser to clean the contacts.
Gently brush the copper strip with the pencil eraser to remove any potential obstruction or debris.
You may also use any type of lint free cloth or a coffee filter.
Again, gently wipe the copper strip with the lint free cloth removing any type of obstruction or debris.
Once this is complete, replace the cartridge in the cradle, close the lid and then follow any on screen prompts that may appear.
If the problem persists after returning the cartridge to its cradle, you will want to reset your printer.
This can be done by turning off your computer and your printer with the cartridges installed.
Unplug your printer and leave your machines off for 2 minutes.
Restart the printer and your computer, and attempt your print again.
If you have attempted both of these procedures and you encounter the same error, there is most likely an electrical problem with the cartridge, and you should return the cartridge to the place of purchase.
If you need to print right away and this troubleshooting did not solve the problem with your cartridge, please select the option entitled "One Cartridge Printing"
La cartouche et l’imprimante utilisées dans cette vidéo peuvent ne pas sembler identiques aux vôtres, mais les mêmes procédures utilisées dans cette vidéo peuvent être utilisées pour la cartouche pour laquell vous avez choisi de résoudre les problèmes.
If you have tried all the possible troubleshooting solutions for the error you are experiencing but need to print before you are able to get a replacement cartridge, please attempt the following procedure in order to continue printing with your non-defective cartridge.
Your printer should have the option to print in either "color only" or "black and white only". This is usually located in the printer toolbox either under Printer Settings or Advanced Settings. Please consult your printer's user manual to determine where this feature is located for your model.
Choosing the option to print in only one color may allow you to print until you are able to get a replacement cartridge.
Please remember to change your printer setting back to allow for printing in all colors once you have replaced your cartridge.
La cartouche et l’imprimante utilisées dans cette vidéo peuvent ne pas sembler identiques aux vôtres, mais les mêmes procédures utilisées dans cette vidéo peuvent être utilisées pour la cartouche pour laquell vous avez choisi de résoudre les problèmes.
If you have printed a document and are unsatisfied with the print quality, you may need to perform a cleaning cycle in order to improve the quality of your print.
This video will show you an example of how to perform a cleaning cycle through your printer's control panel.
If your printer does not have a control panel, please consult your printer's user manual for instructions on how to perform a cleaning cycle. (Or you may go to the manufacturer's website to view your printer's user manual online.)
Press the Menu button on your printer until you see Maintenance
Using the arrow keys, scroll to Cleaning and press OK
Your printer will perform a cleaning cycle.
Once the cycle is complete, you will want to print a test page to see if the print quality has improved.
If the print on your test page is satisfactory, you may return to the document you wish to print and resume printing.
You may also perform another cleaning cycle if you are not satisfied with your test page. Please be aware that cleaning your printhead does consume ink; and therefore, should only be completed when necessary
If you are still not satisfied with the print after you perform the cleaning cycles, the next step is to try blotting the cartridge in order to make sure that the printhead nozzles are not clogged with dry ink.
You will want to use a lint free towel such as a coffee filter. Fold the filter in half.
We also suggest using a paper towel or other absorbent material to place under the lint free cloth to protect your surface from the ink as it may stain your underlying surface.
Remove your cartridge from the printer.
Locate the printhead. This is on the bottom of the cartridge. Do not touch the printhead or bottom of your cartridge as this can damage the cartridge.
Hold the cartridge with the printhead facing downward.
Simply press the printhead of the cartridge onto the coffee filter and hold for three (3) seconds.
Upon lifting the cartridge back up, three (3) colors should appear on the lint free cloth.
If a good blot does appear on the cloth, reinstall your cartridge and attempt your print again.
If your cartridge does not provide a good blot, it is possible that the ink has all been consumed; and you should replace your cartridge.
However, if you are just installing the cartridge for the first time and/or have recently installed the cartridge and are experiencing this problem, you should return your cartridge to the place of purchase.
If you need to print right away and this troubleshooting did not solve the problem with your cartridge, please select the option entitled "One Cartridge Printing"
La cartouche et l’imprimante utilisées dans cette vidéo peuvent ne pas sembler identiques aux vôtres, mais les mêmes procédures utilisées dans cette vidéo peuvent être utilisées pour la cartouche pour laquell vous avez choisi de résoudre les problèmes.
If you receive an error message stating that the “alignment failed” or that the ”alignment could not be completed”, this may indicate that the printer is not properly recognizing the cartridge.
Remove the cartridge from your printer and locate the copper contacts. Ensure that the copper strip is intact; and if so, you will want to clean the contacts from any obstruction or debris as this may be preventing the alignment from completing.
Using a lint free cloth (such as a coffee filter), gently wipe the copper contacts to remove any obstruction or debris.
It may also be helpful to clean the nozzle plate to ensure a proper ink flow. Dampen a lint-free cloth with bottled water and gently wipe the nozzle plate 2-3 times until you see ink appearing on the cloth. Please note that the ink will stain any underlying surfaces so please use caution and discard the cloth as soon as the nozzle plate has been cleaned.
Reinstall your cartridge into the printer and attempt the alignment process again.
If the error continues, it may be necessary to perform a cleaning cycle to improve the quality of the print and allow the alignment process to be completed. Every printer is different so please consult your printer’s user manual for instructions on performing a cleaning cycle on your specific printer.
If you are not able to perform a cleaning cycle or if the alignment fails even after performing a cleaning cycle, please ensure that the scanner glass is clean and free from fingerprints or debris (this applies to certain models only).
If these steps do not allow the printer to align the cartridge(s), you will need to return the cartridge(s) to the place of purchase.
La cartouche et l’imprimante utilisées dans cette vidéo peuvent ne pas sembler identiques aux vôtres, mais les mêmes procédures utilisées dans cette vidéo peuvent être utilisées pour la cartouche pour laquell vous avez choisi de résoudre les problèmes.
If you encounter an error message stating that the cartridge cannot be recognized, is an incompatible cartridge, the wrong cartridge is installed or if your printer has blinking lights, there may be a simple solution to fix this.
Confirm that the cartridge pictured matches the cartridge you have in your hand or installed in your machine.
Confirm that the printer you are using is listed in the printer compatibility table as a suitable printer for the cartridge you are trying to install.
If ONE of these TWO criteria do NOT match, you have most likely received the incorrect cartridge for your printer. Please visit our PRINTER COMPATIBILITY page in order to determine what cartridge you need for your machine.
Once you have confirmed you have the correct cartridge for your printer, open the cover on the printer and remove the cartridge.
Upon removing the cartridge, you will need to locate the copper contacts . If the copper strip is missing, the cartridge will not function and will need to be replaced.
Make sure not to touch or remove the copper strip. These contacts communicate with the printer to print your documents.
If the copper strip is intact, you may need to clean the contacts from any type of obstruction or debris as this may be the cause of the error.
You may use a pencil eraser to clean the contacts.
Gently brush the copper strip with the pencil eraser to remove any potential obstruction or debris.
You may also use any type of lint free cloth or a coffee filter.
Again, gently wipe the copper strip with the lint free cloth removing any type of obstruction or debris.
Once this is complete, replace the cartridge in the cradle, close the lid and then follow any on screen prompts that may appear.
If the problem persists after returning the cartridge to its cradle, you will want to reset your printer.
This can be done by turning off your computer and your printer with the cartridges installed.
Unplug your printer and leave your machines off for 2 minutes.
Restart the printer and your computer, and attempt your print again.
If you have attempted both of these procedures and you encounter the same error, there is most likely an electrical problem with the cartridge, and you should return the cartridge to the place of purchase.
If you need to print right away and this troubleshooting did not solve the problem with your cartridge, please select the option entitled "One Cartridge Printing"
La cartouche et l’imprimante utilisées dans cette vidéo peuvent ne pas sembler identiques aux vôtres, mais les mêmes procédures utilisées dans cette vidéo peuvent être utilisées pour la cartouche pour laquell vous avez choisi de résoudre les problèmes.
To install your remanufactured cartridge in your printer, begin by removing the old cartridge from the printer.
Next, remove the plastic clip from the cartridge. Clips come in many forms and may not look exactly like the one in the video.
Now your cartridge may be installed into the printer.
*The cartridge and printer shown may vary from yours, but the general installation instructions are the same.
La cartouche et l’imprimante utilisées dans cette vidéo peuvent ne pas sembler identiques aux vôtres, mais les mêmes procédures utilisées dans cette vidéo peuvent être utilisées pour la cartouche pour laquell vous avez choisi de résoudre les problèmes.
Confirm that the cartridge pictured matches the cartridge you have in your hand or installed in your machine.
Confirm that the printer you are using is listed in the printer compatibility table as a suitable printer for the cartridge you are trying to install.
If ONE of these TWO criteria do NOT match, you have most likely received the incorrect cartridge for your printer. Please visit our PRINTER COMPATIBILITY page in order to determine what cartridge you need for your machine.
Once you have confirmed you have the correct cartridge for your printer, the first step is to make sure you have properly removed the clip from the cartridge.
This clip protects the electrical circuitry on the cartridge and also keeps the cartridge from leaking.
Once the clip has been removed, you should see a copper strip and this is the cartridge’s contacts. These contacts communicate with the printer to print your documents. Please keep in mind that there are various styles of clips and that the clip we are removing in the video may not be identical to the one on your cartridge. Clips will vary in color, size and shape depending on the cartridge model and supplier of your remanufactured inkjet.
After you remove the clip, please make sure that you are installing your cartridge into the correct location in the printer. Please consult your printer’s user manual to learn how to correctly install your remanufactured inkjet cartridge.
If you are trying to install the cartridge in the correct location, the cartridge may have been mislabeled and should be returned to the place of purchase.
If you need to print right away and this troubleshooting did not solve the problem with your cartridge, please select the option entitled "One Cartridge Printing"
La cartouche et l’imprimante utilisées dans cette vidéo peuvent ne pas sembler identiques aux vôtres, mais les mêmes procédures utilisées dans cette vidéo peuvent être utilisées pour la cartouche pour laquell vous avez choisi de résoudre les problèmes.
Some remanufactured cartridges come with a clip that protects the printhead and helps to preserve and maintain the quality of the cartridge.
To remove this clip, place the cartridge on a solid surface. Holding the clip with one hand, press down on the cartridge with the other hand and pull back on the clip.
You may also find it helpful to think of the clip as the tab on a soda can. Place the cartridge on a solid surface with the clip at the top. Hold the cartridge in one hand and "peel" the clip back with the other.
Some resistance is normal so don't be alarmed.
You may notice some residual ink on the pad or some ink on the printhead of the cartridge. This is also normal as some clips serve to prime the cartridge in order to allow it to function properly.
Once the clip has been removed, you may install the cartridge into your printer as normal.
If you need to print right away and this troubleshooting did not solve the problem with your cartridge, please select the option entitled "One Cartridge Printing"
La cartouche et l’imprimante utilisées dans cette vidéo peuvent ne pas sembler identiques aux vôtres, mais les mêmes procédures utilisées dans cette vidéo peuvent être utilisées pour la cartouche pour laquell vous avez choisi de résoudre les problèmes.
If you notice that the ink gauge displays low or no ink level, DO NOT be alarmed. This is very common because you are using a remanufactured inkjet. The ink gauge on your printer will no longer read the ink levels correctly because it does not recognize your cartridge as “new”. There is no way to reset this gauge, but this message can be bypassed easily when necessary and will not affect your printing performance.
Keep in mind that the ink gauges on printers only serve as an ESTIMATE of how much ink may be remaining in the cartridge.
To continue printing, press and hold the stop/reset button or the resume button for 10 seconds.
You may click here to see if your printer model is listed and follow the instructions specific to your printer. Otherwise, please consult your printer’s user manual if you are not sure which button to press.
If your printer displays a low or empty ink level, you may be able to resolve this by cleaning the cartridge contacts.
Open the cover on the printer and remove the cartridge. Upon removing the cartridge, you will need to locate the copper contacts . If the copper strip is missing, the cartridge will not function and will need to be replaced.
Make sure not to touch or remove the copper strip. These contacts communicate with the printer to print your documents.
If the copper strip is intact, you may need to clean the contacts from any type of obstruction or debris as this may be the cause of the error.
•You may use a pencil eraser to clean the contacts. •Gently brush the copper strip with the pencil eraser to remove any potential obstruction or debris. •You may also use any type of lint free cloth or a coffee filter. •Again, gently wipe the copper strip with the lint free cloth removing any type of obstruction or debris.
Once this is complete, replace the cartridge in the cradle, close the lid and then follow any on screen prompts that may appear.
If that does not clear the error, your cartridge may not contain the technology that will read a correct ink level. If this is the case, this message can be bypassed easily and will not affect your printing performance.
Keep in mind that the ink gauges on printers only serve as an ESTIMATE of how much ink may be remaining in the cartridge.
To continue printing, press and hold the stop/reset button or the resume button for 10 seconds.
Please consult your printer’s user manual if you are not sure which button to press.
La cartouche et l’imprimante utilisées dans cette vidéo peuvent ne pas sembler identiques aux vôtres, mais les mêmes procédures utilisées dans cette vidéo peuvent être utilisées pour la cartouche pour laquell vous avez choisi de résoudre les problèmes.
If your cartridge has stopped printing and you have just recently installed it into your machine, please follow the steps below to resolve the issue.
If you notice that the ink gauge displays low or no ink level, DO NOT be alarmed. This is very common because you are using a remanufactured inkjet. The ink gauge on your printer will no longer read the ink levels correctly because it does not recognize your cartridge as “new”. There is no way to reset this gauge, but this message can be bypassed easily when necessary and will not affect your printing performance.
Keep in mind that the ink gauges on printers only serve as an ESTIMATE of how much ink may be remaining in the cartridge.
To continue printing, press and hold the stop/reset button or the resume button for 10 seconds.
You may click here to see if your printer model is listed and follow the instructions specific to your printer. Otherwise, please consult your printer’s user manual if you are not sure which button to press.
La cartouche et l’imprimante utilisées dans cette vidéo peuvent ne pas sembler identiques aux vôtres, mais les mêmes procédures utilisées dans cette vidéo peuvent être utilisées pour la cartouche pour laquell vous avez choisi de résoudre les problèmes.
If you are not able to receive faxes automatically due to a low ink message, you can deactivate the ink level detection and manually retrieve any stored faxes. This is usually accomplished through pressing a series of buttons, and your printer manual will provide instructions for your specific printer model. Click here to be directed to the OEM website where you can download your printer's user manual.
Please note that if you deactivate the ink level detection feature, the cartridge will need to be changed immediately when the ink begins to show signs of running out (poor print quality, streaks or lines in the print, etc). If the cartridge runs out of ink and a fax is printed inadequately, you will not be able to reprint the page. Once a page of the fax prints, the fax is deleted from memory and cannot be retrieved.
La cartouche et l’imprimante utilisées dans cette vidéo peuvent ne pas sembler identiques aux vôtres, mais les mêmes procédures utilisées dans cette vidéo peuvent être utilisées pour la cartouche pour laquell vous avez choisi de résoudre les problèmes.
If you encounter an error message stating that the cartridge cannot be recognized, is an incompatible cartridge, the wrong cartridge is installed or if your printer has blinking lights, there may be a simple solution to fix this.
Confirm that the cartridge pictured matches the cartridge you have in your hand or installed in your machine.
Confirm that the printer you are using is listed in the printer compatibility table as a suitable printer for the cartridge you are trying to install.
If ONE of these TWO criteria do NOT match, you have most likely received the incorrect cartridge for your printer. Please visit our PRINTER COMPATIBILITY page in order to determine what cartridge you need for your machine.
Once you have confirmed you have the correct cartridge for your printer, open the cover on the printer and remove the cartridge.
Upon removing the cartridge, you will need to locate the copper contacts . If the copper strip is missing, the cartridge will not function and will need to be replaced.
Make sure not to touch or remove the copper strip. These contacts communicate with the printer to print your documents.
If the copper strip is intact, you may need to clean the contacts from any type of obstruction or debris as this may be the cause of the error.
You may use a pencil eraser to clean the contacts.
Gently brush the copper strip with the pencil eraser to remove any potential obstruction or debris.
You may also use any type of lint free cloth or a coffee filter.
Again, gently wipe the copper strip with the lint free cloth removing any type of obstruction or debris.
Once this is complete, replace the cartridge in the cradle, close the lid and then follow any on screen prompts that may appear.
If the problem persists after returning the cartridge to its cradle, you will want to reset your printer.
This can be done by turning off your computer and your printer with the cartridges installed.
Unplug your printer and leave your machines off for 2 minutes.
Restart the printer and your computer, and attempt your print again.
If you have attempted both of these procedures and you encounter the same error, there is most likely an electrical problem with the cartridge, and you should return the cartridge to the place of purchase.
If you need to print right away and this troubleshooting did not solve the problem with your cartridge, please select the option entitled "One Cartridge Printing"
La cartouche et l’imprimante utilisées dans cette vidéo peuvent ne pas sembler identiques aux vôtres, mais les mêmes procédures utilisées dans cette vidéo peuvent être utilisées pour la cartouche pour laquell vous avez choisi de résoudre les problèmes.
If you have tried all the possible troubleshooting solutions for the error you are experiencing but need to print before you are able to get a replacement cartridge, please attempt the following procedure in order to continue printing with your non-defective cartridge.
Your printer should have the option to print in either "color only" or "black and white only". This is usually located in the printer toolbox either under Printer Settings or Advanced Settings. Please consult your printer's user manual to determine where this feature is located for your model.
Choosing the option to print in only one color may allow you to print until you are able to get a replacement cartridge.
Please remember to change your printer setting back to allow for printing in all colors once you have replaced your cartridge.
La cartouche et l’imprimante utilisées dans cette vidéo peuvent ne pas sembler identiques aux vôtres, mais les mêmes procédures utilisées dans cette vidéo peuvent être utilisées pour la cartouche pour laquell vous avez choisi de résoudre les problèmes.
If you have printed a document and are unsatisfied with the print quality, you may need to perform a cleaning cycle in order to improve the quality of your print.
This video will show you an example of how to perform a cleaning cycle through your printer's control panel.
If your printer does not have a control panel, please consult your printer's user manual for instructions on how to perform a cleaning cycle. (Or you may go to the manufacturer's website to view your printer's user manual online.)
Press the Menu button on your printer until you see Maintenance
Using the arrow keys, scroll to Cleaning and press OK
Your printer will perform a cleaning cycle.
Once the cycle is complete, you will want to print a test page to see if the print quality has improved.
If the print on your test page is satisfactory, you may return to the document you wish to print and resume printing.
You may also perform another cleaning cycle if you are not satisfied with your test page. Please be aware that cleaning your printhead does consume ink; and therefore, should only be completed when necessary
If you are still not satisfied with the print after you perform the cleaning cycles, the next step is to try blotting the cartridge in order to make sure that the printhead nozzles are not clogged with dry ink.
You will want to use a lint free towel such as a coffee filter. Fold the filter in half.
We also suggest using a paper towel or other absorbent material to place under the lint free cloth to protect your surface from the ink as it may stain your underlying surface.
Remove your cartridge from the printer.
Locate the printhead. This is on the bottom of the cartridge. Do not touch the printhead or bottom of your cartridge as this can damage the cartridge.
Hold the cartridge with the printhead facing downward.
Simply press the printhead of the cartridge onto the coffee filter and hold for three (3) seconds.
Upon lifting the cartridge back up, three (3) colors should appear on the lint free cloth.
If a good blot does appear on the cloth, reinstall your cartridge and attempt your print again.
If your cartridge does not provide a good blot, it is possible that the ink has all been consumed; and you should replace your cartridge.
However, if you are just installing the cartridge for the first time and/or have recently installed the cartridge and are experiencing this problem, you should return your cartridge to the place of purchase.
If you need to print right away and this troubleshooting did not solve the problem with your cartridge, please select the option entitled "One Cartridge Printing"
La cartouche et l’imprimante utilisées dans cette vidéo peuvent ne pas sembler identiques aux vôtres, mais les mêmes procédures utilisées dans cette vidéo peuvent être utilisées pour la cartouche pour laquell vous avez choisi de résoudre les problèmes.
If you have printed a document and are unsatisfied with the print quality, you may need to perform a cleaning cycle in order to improve the quality of your print.
This video will show you an example of how to perform a cleaning cycle through your printer's control panel.
If your printer does not have a control panel, please consult your printer's user manual for instructions on how to perform a cleaning cycle. (Or you may go to the manufacturer's website to view your printer's user manual online.)
Press the Menu button on your printer until you see Maintenance
Using the arrow keys, scroll to Cleaning and press OK
Your printer will perform a cleaning cycle.
Once the cycle is complete, you will want to print a test page to see if the print quality has improved.
If the print on your test page is satisfactory, you may return to the document you wish to print and resume printing.
You may also perform another cleaning cycle if you are not satisfied with your test page. Please be aware that cleaning your printhead does consume ink; and therefore, should only be completed when necessary
If you are still not satisfied with the print after you perform the cleaning cycles, the next step is to try blotting the cartridge in order to make sure that the printhead nozzles are not clogged with dry ink.
You will want to use a lint free towel such as a coffee filter. Fold the filter in half.
We also suggest using a paper towel or other absorbent material to place under the lint free cloth to protect your surface from the ink as it may stain your underlying surface.
Remove your cartridge from the printer.
Locate the printhead. This is on the bottom of the cartridge. Do not touch the printhead or bottom of your cartridge as this can damage the cartridge.
Hold the cartridge with the printhead facing downward.
Simply press the printhead of the cartridge onto the coffee filter and hold for three (3) seconds.
Upon lifting the cartridge back up, three (3) colors should appear on the lint free cloth.
If a good blot does appear on the cloth, reinstall your cartridge and attempt your print again.
If your cartridge does not provide a good blot, it is possible that the ink has all been consumed; and you should replace your cartridge.
However, if you are just installing the cartridge for the first time and/or have recently installed the cartridge and are experiencing this problem, you should return your cartridge to the place of purchase.
If you need to print right away and this troubleshooting did not solve the problem with your cartridge, please select the option entitled "One Cartridge Printing"
* Rendement de page basé sur des impressions avec une couverture de page de 5 %.
A small electrical patch containing contacts which stores information for interaction between the cartridge and the printer. Not all inkjet cartridges have a chip. Most inkjet cartridges contain a flexible ribbon (called a "flex ribbon") that contains the information for interaction with the printer.
A plastic part used to protect the contacts and nozzle plate during transportation and before use.
A cartridge that is made entirely of new components to resemble the OEM. Sometimes the cartridge only resembles the OEM on the exterior however most cases resemble the OEM both internally and externally.
A series of copper squares that makes contact and communicates with the printer.
The portion of the printer where the inkjet cartridges are installed. This device also carries the inkjet cartridges back and forth across the page creating the desired image.
Prints blue shades
Dye based inks are typically found in color cartridges; however, there are some cases where black cartridges are dye based (photo blacks are dye based). Dye based inks are not water proof or water resistant. They are available in a variety of shades which aids in the color matching to the OEM.
A cartridge that contains foam in one or more areas of the cartridge. The foam acts as a sponge holding the ink in the cartridge however adequately releasing the ink as needed when the space becomes available in the ink reservoir.
An integrated inkjet cartridge has a nozzle plate (printhead) installed on the cartridge along with an electric flexible ribbon connecting the nozzle plate to the electrical contact that interact with the printer.
Prints red shades
A non-integrated inkjet cartridge does not have a nozzle plate included on the cartridge. The nozzle plate for these types of cartridges is included in the printer. The printhead is a consumable item; in some cases, however, in others the printhead is not replaceable. In most cases the chip can be replaced on these style cartridges allowing them to respond to the printers exactly like the original.
Consists of a series of tiny holes that eject ink to form an image or text when instructed to do so by the computer through communication of the chip or flex ribbon.
Original Equipment Manufacturer; the brand new product produced by the company that produced the printer (i.e. HP, Lexmark, Dell, etc)
At times, OEM manufacturers make updates to ink cartridges and/or printer firmware that will cause printers to produce an error message that states “older generation” upon the installation of a cartridge. This firmware update requires that a customer purchase an OEM for their printer or insert a “newer generation” cartridge in order for the printer to function properly. This affects OEM as well as remanufactured cartridges. Inkjet remanufacturers are able to stay on top of these updates and begin producing the “newer generation” cartridges as soon as possible. For more information on these updates, click here for the HP 61 series or click here for the HP 950/951 series.
Lighter shades of black which allows for more color combinations and more "life-like" photographs.
Lighter shades of blue which allows for more color combinations and more "life-like" photographs [i.e. better flesh tones]
Lighter shades of red which allows for more color combinations and more "life-like" photographs [i.e. better flesh tones]
To pull ink from the foam or ink reservoir down to the nozzles preparing them for printing. This is a regular operation performed by the printer, but can also be manually performed to aid in producing an acceptable print.
A cartridge that has no foam inside and consists either of a bag/lining or a series of channels and canals. Both of these mechanisms adequately dispense the ink at the correct rate.
Pigment based inks are typically found in black cartridges; however, there are some cases where color cartridges are pigment based (some Epson, Kodak, and some wide format printer applications). Pigment based inks are water resistant and fade resistant; however, they do not come in many shades so color matching to the OEM is difficult. Pigment based inks also have a higher cost associated with them than do the dye based inks.
An inkjet spittoon is a component in inkjet printers that collects the ink that is removed from the cartridge when the inkjet is primed. This spittoon (sometimes called a reservior) can be either a plastic tray or a piece of foam that absorbs the excess ink. Some of the ink can dry (which makes the foam not absorb as well), and the ink that isn’t absorbed sits in the bottom of the printer. This is how ALL inkjet printers work, which is why it is never a good idea to move an inkjet printer as there will more than likely be ink in the bottom (especially older printers or printers that are used a lot).
A cartridge that is foam based and contains 3 different colors of ink in one cartridge. Typically these colors of ink are Cyan/Magenta/Yellow however there are photo cartridges that contain Photo Cyan/Photo Magenta/Photo Black.
Yield increase
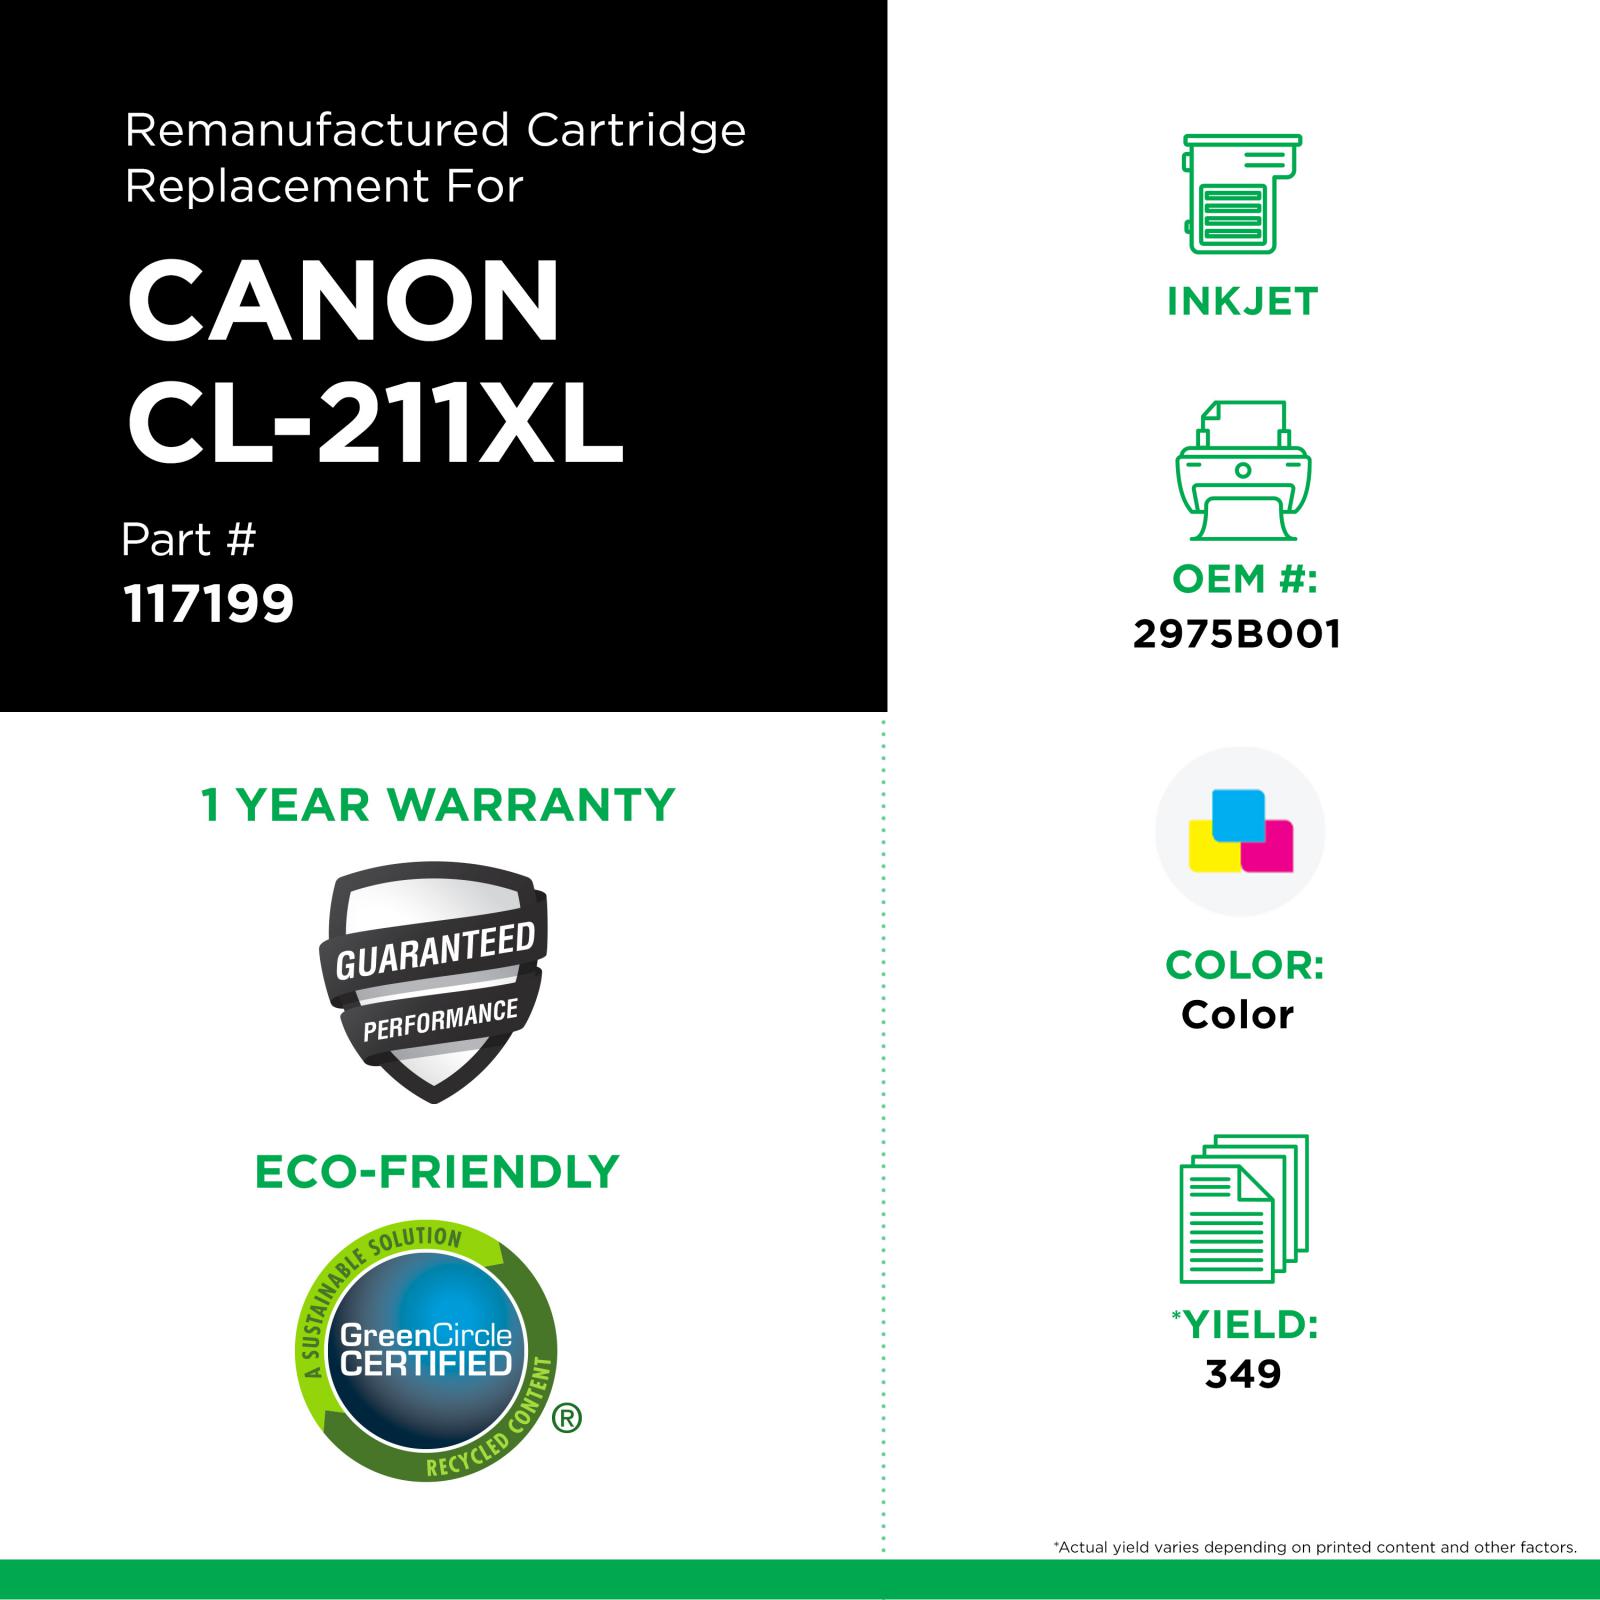
Les cartouches d’imprimante remanufacturées à rendement étendu de Clover Imaging sont conçues, élaborées et fabriquées pour offrir une qualité supérieure et une performance améliorée, tout en surpassant les rendements de pages les plus élevés du fabricant d’origine. Les cartouches à rendement étendu garantissent des rendements plus élevés et un coût par page plus bas sans sacrifier la densité ni la qualité d’impression. Les cartouches d’imprimante remanufacturées à rendement étendu de Clover Imaging sont très durables et ont été certifiées par GreenCircle comme produits en circuit fermé contenant au moins 86 % de contenu recyclé. Pour les entreprises à la recherche d’une impression de haute qualité, durable et à un prix abordable, le choix est évident.
Contenu recyclé certifié
GreenCircle est un écolabel indépendant et tiers qui reconnaît l'engagement d'une organisation à réutiliser les matériaux pour soutenir une économie circulaire et réduire sa dépendance aux matières vierges. Les cartouches de toner remanufacturées de Clover Imaging Group sont certifiées GreenCircle pour contenir 86 % de contenu recyclé et les cartouches d'encre sont certifiées à 99 %..
Toner à faible émission
Les toners à faible émission utilisés par Clover Imaging Group ont été pré-approuvés par Nordic Ecolabelling pour une utilisation dans les cartouches de toner remanufacturées certifiées Nordic Swan Ecolabel. Ces toners sont spécialement formulés pour garantir que les exigences applicables du Nordic Swan Ecolabel sont respectées, y compris des critères fixant des limites strictes aux émissions de composés organiques volatils et interdisant la présence de certains polluants et autres substances nocives..
2022 Aspire Sustainability Comparative LCA, commissioned by Clover Imaging Group.
Information
Information
Information
INFORMATION
Êtes-vous certains de vouloir procéder à la déconnexion?
INFORMATION
Appuyez sur OK pour passer à la région Clover Imaging Group
Choix multiples
Cet article est disponible pour vente inconditionnelle ou échange d'achat. Veuillez faire un choix ci-dessous.
Récupérer les données de compte
Veuillez patienter...
Information
Nous vous remercions pour l'intérêt que vous portez à CIG! En raison de la fonctionnalité robuste sur notre site, nous ne pouvons que soutenir les navigateurs Web les plus courants. Nous vous recommandons de mettre à niveau votre navigateur à la dernière version de Internet Explorer, Google Chrome ou Mozilla Firefox.
Information
Votre session prendra fin dans5minute(s).
Information
Votre session est expirée. Vous êtes maintenant déconnecté.
Erreur information introuvable
La courriel fourni est introuvable.
S'il vous plaît Inscription.
Courriel n'est pas valide.
Merci
Courriel pour récupération du mot de passe a été envoyé. Veuillez suivre les instructions dans le courriel pour changer votre mot de passe.
Vidéo
Vidéo
Vidéo
Vidéo
Vidéo
Tutoriels en ligne
Téléverser logo
Renseignements d'expédition ()
INFORMATION
La création de votre document est en cours. Veuillez attendre le téléchargement.
Cliquer sur le bouton vert "Créer nouvel utilisateur"
Remplissez les champs du formulaire pour votre nouvel utilisateur. Sélectionnez les autorisations de votre nouvel utilisateur et attribuer-lui un nom d'utilisateur et mot de passe. Cliquez sur Enregistrer. Vous recevrez un courriel confirmant que le nouvel utilisateur a été créé avec succès. Suivez ces instructions pour configurer chaque nouvel utilisateur.
Après avoir créé un nouvel utilisateur, le nouvel utilisateur recevra un courriel automatisé avec son nouveau nom d'utilisateur et mot de passe. Il recevra des instructions sur la façon de changer un mot de passe s'il souhaite changer ce mot de passe éventuellement. Cependant, en tant qu'administrateur, vous pourrez toujours supprimer/modifier les utilisateurs, voir leurs renseignements de profil (y compris leur mot de passe ) et modifier leurs autorisations.
Si vous devez modifier un utilisateur, il existe des liens à côté de chaque utilisateur pour modifier ou supprimer le profil de l'utilisateur.
Si vous supprimez un utilisateur, l'utilisateur apparaîtra désormais sur la Page des utilisateurs supprimés, mais vous pouvez réactiver à tout moment si vous avez besoin de le faire.
Vidéo CIG
Information
Télécharger termes et conditions
Téléverser logo du client
Warning
Please note that this is a bid item that's part of the Silver Bullet program. Make sure that you have been approved to ship Silver Bullet items to this customer prior to placing an order. If this customer has not been approved, the order will be cancelled. Thank you.
Warning
Please note that at least one of selected items is a bid item that's part of the Silver Bullet program. Make sure that you have been approved to ship Silver Bullet items to this customer prior to placing an order. If this customer has not been approved, the order will be cancelled. Thank you.


 Yield increase


 Choix multiples

 Information
 Merci
Merci
 Téléverser logo
 Ajouter une nouvelle Expédier-à adresse
